This section follows on from Part 1 – Estonian Bronze Spiral Tube/Coil Decorations.
Preface
Before I launch into the thoughts and techniques I’m using to make this object, I’d like to mention that I am only just beginning my foray into Estonian handiworks, I’ve not done anything like this before, and I haven’t yet found any tutorials or much guidance on *how* to make these. This creation represents me problem solving in an attempt to emulate images/finds/reconstructions of 14th century headdresses. I admit that it may not be the easiest or correct way of achieving the end goal, but it is a hell of a lot of fun to try and figure it out 😀
Secondly, most of my references are (unsurprisingly) written in Estonian. I am definitely not familiar with the language and have been using Google Translate to try and understand the content that accompanies the images – so please keep in mind that the translations, and my understanding of the details, will not be perfect.
In my primary inspiration for this project – page 39 of Valk et. al 2014– there appear to be 4 tails that were attached to the back of the headdress. There are two different patterns, with each pattern repeated in two tails. I chose this as my primary inspiration (with inputs from my other sources as well) because it is the most whole of the wreath headdresses I have seen – you can see definitively the full length of at least two of the tails and the headband appears to be relatively whole.
More on Siksälä wreath headdresses
This background information follows on from Part 1.
There is a cemetery in Siksälä (south-eastern corner of Estonia) close to the Latvian and Russian borders that contain many Iron Age and medieval burials. Many hundreds of grave sites have been uncovered in the area with finds ranging from the 11th century to the mid-15th century (Valk et. al 2014).
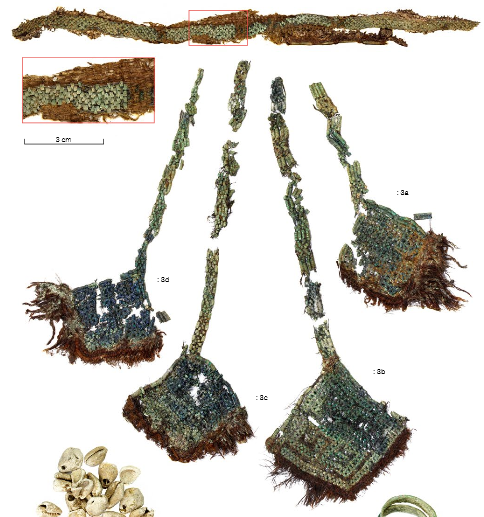
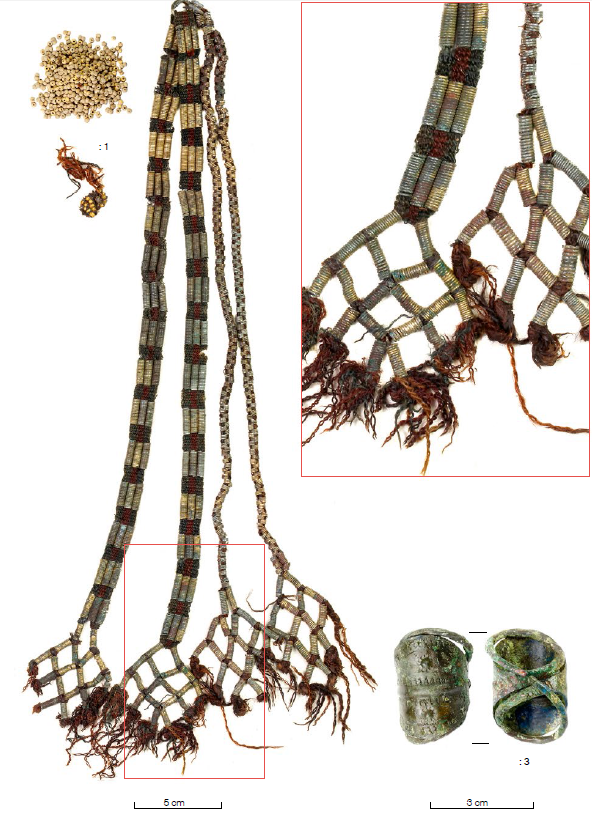
Amongst these finds, 50 wreath headdresses have been identified (Rätsepso, 2013) – which consist of a headband woven of wool decorated in bronze coils, yellow beads, and tin plaques (Rammo 2005; Rätsepso, 2013; Valk et. al 2014). Tails hang from the back of the headbands that end in a fringed rhombus decoration, which are observed to take on several forms:
- Bronze coils braided into horse hair (Figure 2),
- Bronze coils braided into wool (Figure 3 – two right tails), and
- Bronze coils braided into tablet-woven bands (Figure 3 – two left tails).

Figure 2: Bronze spirals woven into horse hair. Estonian headband grave find, page 168, Valk et. al 2014.

Figure 3: Bronze spirals woven into wool. Estonian headdress, as depicted on page 256 of Valk et. al 2014.
The fringed rhombus at the end of the tail is usually either a simple lattice work pattern (Figure 3) or a complex geometric pattern (often based on a swastika pattern – Figure 2).
The fringing on these rhombuses appear to also have two primary styles – tufts sticking out from coils of open lattices (Figure 3) or woven fringes on closed lattices (Figure 2).
In terms of colours of wool used, of the 50 wreath headdresses found, reddish tones are the most common – however, bluish hues (Valk et. al 2012) and yellow tones have also been found (Rätsepso, 2013).
Extant bronze coils used in these headdresses appear to range from 0.15cm to 0.4 in diameter, however, the gauge of the wire is difficult to discern (Rätsepso, 2013).
My Project
Rationale for materials I used
The finds I’ve looked into (see ‘References’) all mention bronze as the metal used to make the coils. Using the scales listed with the extant find on page 39 of veebi II, I estimate that the wire used in the coils of this particular example are 1mm in diameter, which equates to 20 gauge. I ended up buying 200 feet of 20 gauge bronze wire from CopperWireUSA on Etsy. It is a little softer than would be ideal, but it is still working for me at this stage.
Most of the finds for this type of headdress show/describe the weaving material as horse tail hair with wool used as fringing and as a binder, however, the finds on page 255-256 (Valk et. al 2014– Figure 3) describes and depicts a headdress that has wool listed (and visible) as the weaving material with no mention of (or visible) horse hair. In light of wool being easier to source and (presumably) to work with, I chose a red tapestry wool (aligning with my previously mentioned note that red wool appears to have been the most common colour found in extant pieces) to weave my first attempt at this tail as the wool in the find appears to be thick enough to fill the hole within the coils (i.e. they appear to sit snugly, not loosely, on the strands of wool).
Tails 1 and 2
Each of the coils in the top tail of coils in the extant head dress appear to be 4 revolutions of wire in the coil each. To keep the sizing as accurate as possible, and to emulate the extant find as much as possible, I have cut the coils at 4 revolutions each (0.4cm long) for this section.
Instructions for how I made Siksälä wreath headdress tails for my third (final) attempt at making this style of tail can be read on another page of my blog, including written instructions, diagrams, and photos.
First attempt
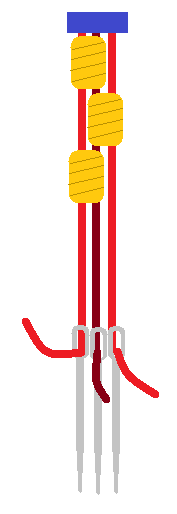
Using the scale once more, I estimate that the top tail (excluding the large rhombus shape at the bottom) is around 20cm long. I also estimated that a similar length would be required to weave the diamond shape at the bottom. I cut three 90cm strands (the estimated length needed plus tails for tying off the ends) of red tapestry wool and pinned them together on a bobbin lace cushion (this particular one is just some sturdy foam wrapped in calico) to anchor them. I threaded each of the three strands of wool with a blunt tapestry needle. To work the pattern in a manner that would look like the extant find, I threaded a coil through the left and middle strands together. Then, I threaded the next coil on the right and middle strands together; alternating between these two combinations of threading until I reached a length of 20cm.
I have drawn a diagram of this in MS Paint (Figure 6) to demonstrate the pattern. The blue rectangle at the top of the image represents where the woollen threads are anchored at the top of the bobbin lace cushion. The yellow rectangles represent four-spiral coils of bronze wire. The three red vertical lines represent three strands of wool, with the middle strand coloured a darker red as a visual aid. The grey objects at the bottom represent blunt tapestry needles.

Figure 6: Diagram of how I wove the first tail of my Estonian headdress attempt (Ceara Shionnach, 2016).
The coils used in the diamond at the bottom of the tail have coils made of 6 revolutions of wire (i.e. 0.6cm long coils), again based on estimates I made using measurements on the image of the find depicted on page 39 of Valk et. al 2014. Just like the find, I am making a 4 x 4 coil grid (i.e. a 5 x 5 stranded grid). To weave the grid, I used the same threads as the tail section. I added a fourth wool thread so that I had two lengths of wool per side (to ensure evenness). On that note, I intend to use 4 wool lengths for the tail next time, with two being used together for the middle strand.
Inspired by the images on the front cover of Silmnähtav – The Manifest (published by Viljandi Kultuuriakadeemia, 2015), my first attempt to weave the rhombus of this first style of tail involved weaving the wool hanging from the bottom of the tail into the pattern using pins to hold them in place.

Figure 7: Weaving the right-hand strands of wool in the diamond shape at the bottom of the tail (Ceara Shionnach, 2016).

Figure 8: Weaving the left-hand strands of wool in the diamond shape at the bottom of the tail (Ceara Shionnach, 2016).
This method was working well, until I realised that I hadn’t left enough space between the coils to weave the last section. I also realised that I had no idea how to add fringing to this structure. This lead me to pull apart the first tail attempt and re-use the coils for attempt 2.
Second attempt
For the second attempt, I used four red wool strands, approximately 80cm in length each, to form the tail. I used two strands together to form the middle of the weave, and one strand each for the two outside strands – otherwise, the method for weaving the tail was the same as depicted/described in my first attempt.
Instead of weaving the leftover lengths of wool at the bottom into the rhombus, I used them to form only the top lines of the rhombus by parting them evenly (2 strands to each side) and threading four coils on each.

Figure 9: After weaving the tail, I split the middle strand pair so that one went to each side (Ceara Shionnach, 2016).

Figure 10: Bronze spirals were threaded onto each pair to form the top edges of the rhombus. (Ceara Shionnach, 2016).
I then cut 8 x 15cm lengths of red wool, grouped them in pairs, and wove them through the top lines of the rhombus (and through each other) in U-shapes to create both the lattice and the threads for the fringing.

Figure 11: Short, additional, paired strands of wool are woven through the top edge in a U-Shape to form part of the internal structure of the rhombus. (Ceara Shionnach, 2016).
Upon finishing the tail, I realised that I had created an entirely closed lattice pattern (including coils along the bottom two edges) – which wasn’t something I could document in the finds. Also, subconsciously influenced by the fringing seen on the brightly coloured shawls also found in these grave sites, I added blue and yellow wool to the red fringing on the rhombus. Whilst these colours are referenced as being part of extant headdresses, I wasn’t confident that my interpretation was solid.
As such, I decided to redo the tail a third time and stick to red wool (more similar to the majority of finds), and to try an open tufted fringe rhombus.
Third attempt
For my third attempt, I followed the method from my second attempt with three key differences; the lattice structure of the rhombus was left open like that observed in the equivalent tail on page 39 (Valk et. al 2014 – Figure 1), the fringing was completed in red wool only, and I teased apart the ply of the wool to make the tassels appear more similar to the various finds published in (Valk et. al 2014).
In line with page 39 (Valk et. al 2014 – Figure 1) having two of these types of tails, I made two – each taking approximately 5 hours of work each (including the making and cutting of coils, the weaving, and the fringing).
A photo of all of the finished tails can be seen below in Figures 16 and 17.
Tails 3 and 4
This tail style is a little more complicated than the first.
I had an idea for constructing this pattern and trialled a method of construction involving two parallel wool strands with two zigzagging strands in between. In my first attempt, the wool strands appear to be too narrow to hold the coils solidly (they slide around a little too much and make the structure less stable than I would like).

Figure 13: Trial weave of the braid using two parallel strands and two zig-zagging strands (Ceara Shionnach, 2016).
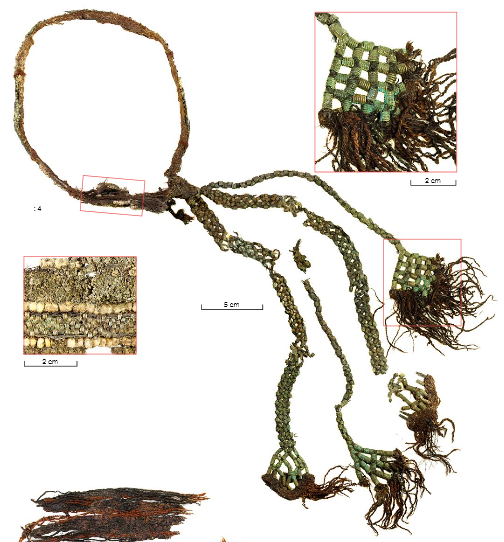
Also, the structure was not particularly strong. Looking at the images in the finds more closely, I came across a close up of a tail from another headdress on page 236 (Valk et. al 2014 – Figure 3) that showed the braid more closely (albeit, braided in horse hair rather than wool). From looking at this clearer image, I realised that the outside strands were not supposed to be parallel to one another and that they curved into the pattern. I managed to emulate the pattern using a 4 strand plait/braid, which resulted in a much stronger structure that more closely mimicked the extant finds.
As far as I could discern from the tails on page 236 (Valk et. al 2014 – Figure 1), the coils were approximately 6 rotations (0.6cm) long – granted, it’s much more difficult to tell with this pattern and I may be mistaken. I chose to use 6 rotation bronze coils in order create the braid.
As with tails 1 and 2, I ended up pairing the strands to ensure rigidity and stability of the pattern.
Again, I estimated the length of the tail (excluding the rhombus) from the scale on the find on page 39 (Valk et. al 2014 – Figure 1) to be approcimately 25cm (excluding the rhombus). This makes these two tails 5cm longer than tails 1 and 2.
For the rhombus, I realised that the bottom rhombus from Figure 1 (bottom left) was created from two different lengths of bronze coils. The long coils I estimated to be 9 rotations (0.9cm) and the short coils were the same length as those used in the braid of the tail (in my case, the coils I used in the braid were six rotations long so I used the same length for the short pieces in the rhombus).
As with tails 1 and 2 and Figure 1, I used an open lattice structure ending in tufted fringing, and teased apart the wool at the ends to make it appear more like the extant fringing remnants.
In line with page 39 (Valk et. al 2014 – Figure 1) having two of these types of tails, I made two – each taking approximately 7.5 hours of work each (including the making and cutting of coils, the weaving, and the fringing).
Finished Tails
Between the four tails, I used the majority of 100 feet of 20 gauge bronze wire (making 498 coils) and a large skein of embroidery wool. The two larger tails took approximately 7.5 hours each, and the two small tails took approximately 5 hours each.
My total construction/experimentation time so far is estimated to be around 35 hours.
Next Steps
Now that I have four completed tails, it’s time to teach myself how to create woven bands for the headbands – I’ll update in a later date with Part 3.
References
Kultuuriakadeemia, Viljandi (2015). Silmnähtav – The Manifest. As published in the Studia Vernacular series. ISBN-10: 998540940X, ISBN-13: 9789985409404.
Rammo, Riina (2005). PRONKSSPIRAALKAUNISTUSED RÕIVASTEL EESTI HAUALEIDUDE PÕHJAL 11. – 14./15. SAJANDIL (Bronze decorations grave finds of Estonia’s clothes based on 11-14/15th century). Published by the University of Tartu (Estonia).
www.arheo.ut.ee/docs/Riina_Rammo_bakalaureus.pdf
Rätsepso, Signe (2013). MUINAS- JA KESKAEGSED PEAPÄRJAD SIKSÄLÄ KALMISTULT Seminaritöö (Ancient and Medieval Cemeteries of Siksal Wreaths Seminar). Tartu University Viljandi Culture, Native Crafts Department, National specialty textiles.
http://register.muinas.ee/ftp/Teadustood2013/SigneRatsepso2013.pdf
Rätsepso, Signe (2014). REKONSTRUKTSIOON SIKSÄLÄ NAISTE PEAPÄRJAST Diplomitöö (RECONSTRUCTION OF SIKSAL WOMEN’S HEADDRESS, Diploma). Tartu University Viljandi Culture, Native Crafts Department, National specialty textiles.
http://register.muinas.ee/ftp/Teadustood2015/SigneRatsepso2014.pdf
Valk, Heiki, Kama, Pikne, Rammo, Riina, and Malve, Martin (2012). The Iron Age and 13th-18th Century Cemetery and Chapel Site of NIKLUSMÄGI: Grave Looting and Archaeology. Published in Archaeological Fieldwork in Estonia 2012, pp 109-132.
http://www.arheoloogia.ee/ave2012/AVE2012_Valkjt_Niklusmagi.pdf
Valk, Heiki, Ratas, Jaana, and Laul, Silvia (2014). Siksälä kalme I, Matuste ja leidude kataloog (Siksälä mound , uncertainties and findings directory). Published by the University of Tartu (Estonia).
http://www.arheo.ut.ee/docs/siksali-II-veebi_.pdf


