For the imminent household/guard of Prince Steffan I and Princess Branwen I of Lochac, Their Highnesses have asked me to make armband sashes.
Blue was requested vfor Steffan’s sashes because blue is a colour of the Lochac1 device, as well a primary colour used in Steffan’s2 device. Stars were chosen as the motif because they are a charge taken from the Lochac device.
Red was requested for Branwen’s sashes because red is also a colour of the Lochac1 device, and a primary colour on Branwen’s3 device. Roses were chosen as the motif because it is the traditional motif used by Queens in the Knowne World.
Finished Sashes
The completed sashes look like this:
Excluding the fringing, each completed sash is approximately 37 inches long by 4 inches wide.
Thank you to those who embroidered sashes, including:
- Duchess Liadan ingen Fheradaig (Barony of Politarchopolis)
- Lady Merione French (College of St Aldhelm)
- Baroness Alessia de cheval Blanc (Barony of Politarchopolis)
- TH Lady Honore Corbaut (Barony of Politarchopolis)
- Serena Rigaletti (Barony of Politarchopolis)
- Lady Emelyn Ffayrhome (Barony of Politarchopolis)
- Mistress Francesca Cellini (Barony of Politarchopolis)
- Mistress Monique de la Maison Rouge (Barony of Politarchopolis)
- Lady Catherine James of Glastonbury (Barony of Politarchopolis)
- TH Mistress Heilwich Gheerts (Barony of Mordenvale)
Materials Used
Cotton-linen blend fabric from Spotlight (red for roses, blue for stars) (approximately 38 inches by 9 inches for each sash, which gets folded in half long ways and sewn up)
White linen for appliqué
Double-sided iron-on transfer
2% Admiralty gold twist cord
Gold/yellow Gutterman sewing thread (silk)
Fringing
Appliqué Instructions
- Print the rose and/or star pattern to size.
- Trace the pattern/s on to the removable paper side of the iron-on transfer paper. You can place multiple stars/roses on a single sheet, really close together, if need be (you don’t need to space them out).
- Iron the white linen.
- Place the iron on transfer with drawn-on patterns with the non-paper side down on the white linen, and iron as per instructions on packaging it came in.
- Cut out the star/rose pattern/s.
- Peel off the paper layer of the transfer.
- Place the rose/star face down (fabric side up) on a pre-cut sash (it should be placed in the centre of one of the sides of the sash)
- Iron, as per transfer paper packaging instructions.
- Draw the detail on to the star/rose with a ceramic pencil (or, other fine pencil/chalk/device suitable for pattern transfer on to material, available at any sewing store).
In the 16th-17th centuries, the edge of the non-wool appliqué fabrics were known to be edged with wax to prevent fraying4. Furthermore, there are examples of glue being used for appliqué4,5. Lastly, there are 16th century examples of appliquéd fabrics with stiff paper glued to the back to provide support5.
The use of iron-on transfer with these sashes was used as an analogy for wax/glue/backing paper. The result is a white star or rose, effectively glued down to the sash before couching begins. This allows for a smooth couching surface and prevents fraying in the future, and also provides a sturdy backing for the appliquéd fabric.
Couching Instructions
The star motifs are simpler to couch than the rose motifs, and are therefore the best choice for beginner couchers.
Couching is an embroidery technique where one thread is laid on the surface of material and sewn down with another (often finer) thread.
In this case, gold twist cord is being couched down with Gutterman silk sewing thread.
Star Motif
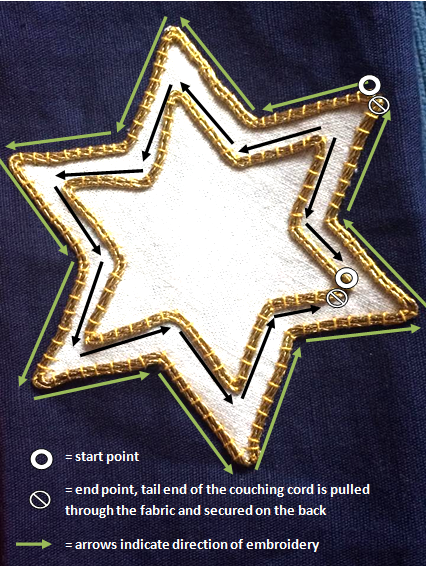
The star motif requires two lines of double-couched gold twist cord. As depicted in the diagram (fourth image down) published by Christian de Holacombe5, the gold cord for the outside border of the star should be stitched on the appliquéd white fabric, but sitting right on the edge. For the inner border, treat the drawn lines as the edge (i.e. most of the couching thread should sit inside the drawn lines, with the couching cord just covering the drawn lines).
- To begin with two stranded couching, cut a length of gold couching cord twice the length required plus an inch. Fold the cord in half and pinch the fold firmly, rolling it between your thumb and forefinger. This makes a neater fold.

When you pinch firmly on the bend of metal couching cord, it forms a fold that allows the two lengths to sit flat against one another.
- Secure your silk thread to the back of the fabric, and bring the needle up to the surface at the end of one of the points of the star.
- Make a stitch through the fold of the gold cord to secure it to the fabric with the silk thread.
- Couch the gold cord the whole way around the star. Stitches should be perpendicular to the gold cord, and equidistant apart (approximately 0.5cm to 1cm apart is a good distance).
- To turn a corner, you separate the paired gold cords and couch them down individually. After you couch the outside cord on the point of the corner, bend it back on itself to create a fold (which will result in a sharper corner). Repeat the process with the second cord.

After the first cord is couched down, bend it back on itself at the point of the corner. This will result in a fold in the gold cord, and a sharper corner.
- Ends of couching thread should be passed through the fabric to the back. Rather than trying to thread the thick couching cord through a needle and then struggling to pull it through the fabric, you can use an awl to help. At the point where you want to finish couching, make a small hole with an awl. Thread a loop of sewing thread through the eye of a needle and bring it up through the hole. Remove the needle, loop it around the end of the couching thread, and use it to carefully but firmly pull the tail through.

If needed, you can use a needle to pass a loop of thread through the hole made by the awl (to use to pull the end of the gold cord through).

Couch about 2cm of the tail of gold cords on the back of the fabric to secure it. You should couch along one of the couching lines of your shape to ensure no sewing thread will be visible on the surface of your embroidery.
The couching pattern used here was inspired by design elements observed in the stars couched on the 11th century Sternenmantel (star mantle) of Saxon King Heinrich II6. This design happens to also be the inspiration for the Laurel Cloak made by Lochac’s Worshipful Company of Broiderers7. I simplified the design quite a bit to just the double outline, and replaced the 8-point star with a 6-point star (to match that depicted on the Lochac device).
Rose Motif
- Ends of couching thread should be passed through the fabric to the back. Rather than trying to thread the thick couching cord through a needle and then struggling to pull it through the fabric, you can use an awl to help. At the point where you want to finish couching, make a small hole with an awl. Thread a loop of sewing thread through the eye of a needle and bring it up through the hole. Remove the needle, loop it around the end of the couching thread, and use it to carefully but firmly pull the tail through.
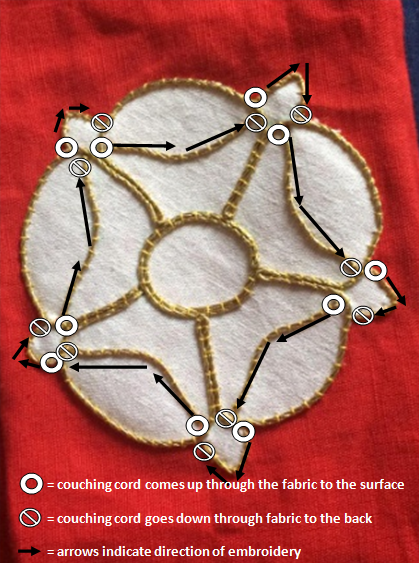
- See in-progress photos of the couched stars for instructions on how to turn corners or sink tails of gold cord through the fabric.
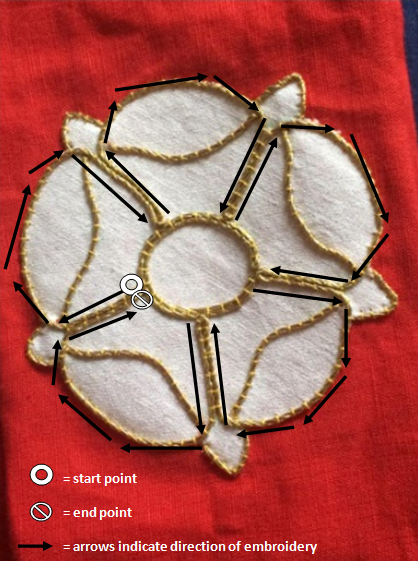
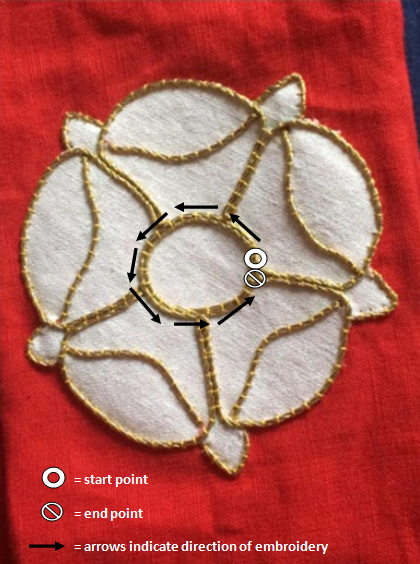
- The circle in the middle of the rose uses a pair of gold threads, however, the rest is couched in single gold cord.
- The couching pattern has three parts:

Rose couching guide step 3 – a single gold cord couched. It goes through the fabric many times to navigate the shape.
This rose was based on a simplified version of a goldworked rose on a 16th century book cover8. The original rose had gold couched outlines with purl infill, however, for simplicity and durability the purl and some of the minor details were omitted in my design.
References
4: Applique Notecover Book by Mathilde Eschenbach (last accessed 13 May 2015).


