Progress as at 14 September 2013
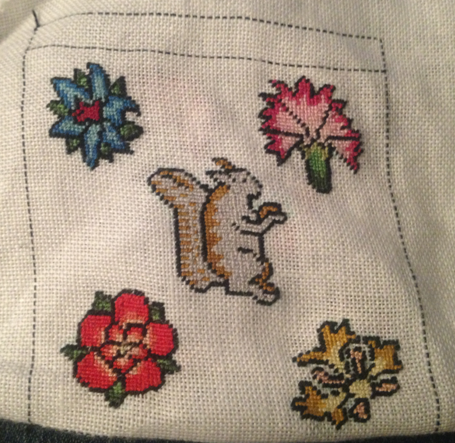
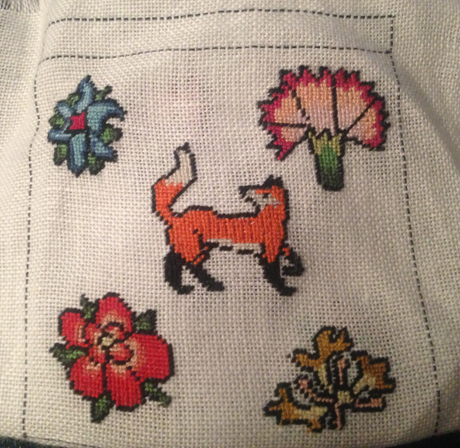
In the 3 weeks since my last update I’ve reached two important milestones in this sweet bag project. The first was the completion of all 10 tent stitch motifs (a stitch I’ve never before used). I estimate that it took me between 30 to 36 hours to complete. I found this stitch easy to execute, but difficult to draw shapes with due to the pixelated nature of it.
I completed the outlines of the shapes by tracing the pattern onto the linen base, using a ceramic pencil, and then following the outlines as best as I could with tent stitch in black silk. I then shaded the shapes with coloured silk in tent stitch.
The most obvious mistake I made with the tent stitch was accidentally stitching one of the roses with only four inner petals, rather than the standard five.
Not being familiar with tent stitch or any similar stitches (e.g. cross stitch), I didn’t realise until I was almost finished the tent stitch that I should have first gridded out the pattern onto graph paper to obtain consistent shapes. Doing so would have made the transference of the pattern easier and more consistent.
The second milestone that I achieved in this time was teaching myself Elizabethan plaited braid stitch and then completing 80% of the stems with it.
Braided stitches are more complex stitches that were used with metallic (gold or silver) threads. Elizabethan plaited braid stitch was commonly used to complete coiled stems in floral motifs in Elizabethan embroidery of the 16th and 17th centuries. It was also used to decorate seams. Plaited braid stitch is mentioned as being used in the descriptions of eight of the extant sweet bags I listed in the appendix I attached to my first update on this project. One of these specifically lists Elizabethan plaited braid stitch. A further seven bags appear to include this stitch, however, the low quality of the images (and lack of descriptions) make it difficult to tell.
Having determined that this stitch would fit in with my motifs well, and in a manner consistent with period practice, the next step was to learn the stitch. It is a relatively complicated stitch to learn, at first, but I am enjoying it as I go. I used Jacqui Carey’s book titled Elizabethan Stitches: A Guide to Historic English Needlework. I definitely recommend it – using this source only I managed to get the basics of the stitch down pat within an hour.

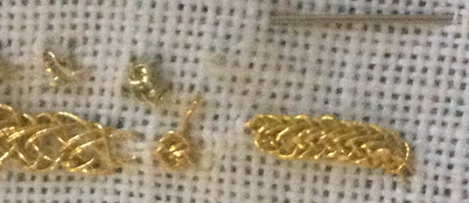
The bottom row, left to right, was my first attempt at Elizabethan plaited braid stitch. I began with a large-ish width gold thread and began with a wide stitch to start with (to make it easier to figure out and see what I was doing). I gradually narrowed the stitch to see how fine I could get it with this thread. The top row, left to right, was my second attempt at this stitch. I used a thin, flat gold thread for this attempt. It didn’t work very well, and the thread kept snapping, so I moved on to a third thread type.

The line on the right is my third attempt at learning Elizabethan plaited braid. I used a smaller width gold thread for this attempt. For the base fabric and stitch size required to match the aesthetics of my sweet bag, this ended up being the goldilocks combination.
It is challenging to keep the tension and an even/consistent stitch, particularly whilst curving or turning. I find that it is easiest to do in a straight line, following the weave of the fabric. I should have all of the stems completed within a day or so.
I will probably end up returning to this stitch to decorate the top, side and bottom seams of my sweet bag later down the track.
In the next three weeks, I am aiming to complete the Elizabethan plaited braid stitch, and filling in the remaining (or majority of the) white/linen background of the bag. The background will be filled in with alternating columns of gold couching and coloured silk backstitch. I’ll explain more about this in my next update.
So… in the mean time…. do ALL of the stitching! 😀
Update as at 15 September 2013
I’ve now finished the plaited braid coils. YAY! I estimate that it’s taken about 27 hours to complete all of the braid stitch. As I said above – it’s a bit of a fiddly stitch.


Looks okay in the pictures- looks AMAZING in real life!