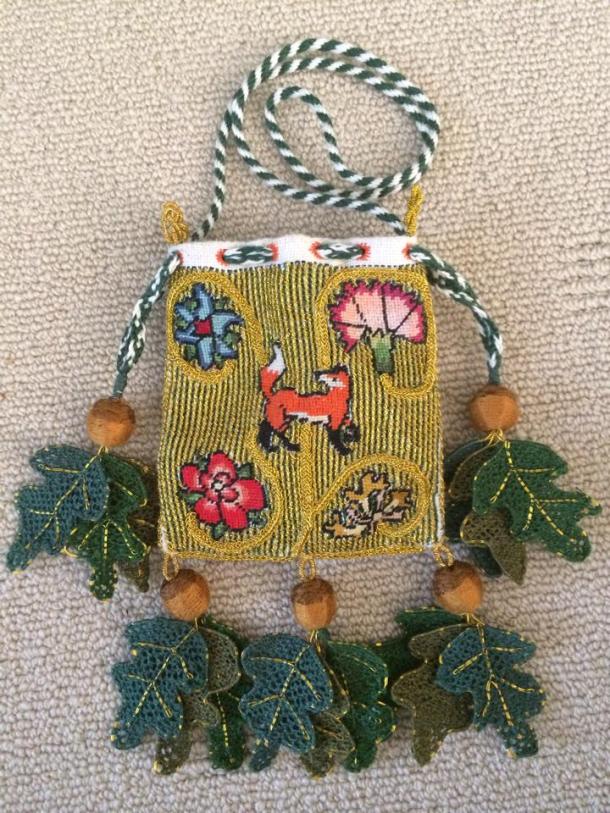
It’s been 6 weeks since my last update, and I’m very close to finishing my sweet bag. All I have left to do is finish the side seams and top seam so there is less white base fabric showing, and make the scent for inside it. This is good news given that it’s due next weekend for Twelfth Night 2014 in Okewaite, Lochac. This project is currently at approximately 162 hours of sewing time (this excludes research and the trial/error of learning new stitches/techniques).
The first milestone met in the past 6 weeks was finishing the 15 needlelace leaf pieces for the tassels. I made 5 x 3 different shades of green silk with a gold thread edging and gold thread couched veins. I used three colours of green silk to add texture to the tassels in place of making shaded leaves (which was too time consuming to be completed before my due date). More explanation on the leaf making process is documented in Sweet Bag – Update 4.

The front of the carboard used as the template for all 15 needlelace tassel pieces. It is almost worn through, but held up for all tassel pieces. The pattern, which I printed from an extant oak leaf embroidery piece (detailed in Sweet Bag – Update 4), was stuck to the front of cardboard with clear stickytape (I applied more stickytape half way through to make the template more sturdy).

The back of the carboard used as the template for all 15 needlelace tassel pieces. It is almost worn through, but held up for all tassel pieces.
Once I sewed the bag up, and before I inserted the silk lining, I attached 3 gold-wrapped loops to the base of the bag to suspend the tassels from. As explained in Sweet Bag – Update 4, three tassels along the base of a sweet bag is relatively common amongst the extant sweet bags I’ve come across. After the loops were attached, I embroidered the base and both sides of the pouch with edged Elizabethan twisted chain stitch (instructions followed from Carey, 2009). It is another stitch I taught myself for the purposes of completing this project.

Close up of the edged Elizabethan twisted chain stitch (instructions from Carey, 2009) – the vertical stitching along the base seam in gold thread.

The 3 loops were attached to the bag prior to stitching the base with edged Elizabethan twisted chain stitch (instructions from Carey, 2009)
I lined the bag with green silk. Then, I used orange silk in buttonhole stitch to make 12 eyelets for the drawstrings to be strung through.
For the handle of the bag, I made an 8 loop fingerloop braid. For the purse strings, I made two 5 loop fingerloop braids. All were made using 20/2 silk thread (green and white) from the White Wolf and the Phoenix store at Pennsic 42. The instructions for these two braid types have been adapted from a 15th century manual by Benns & Barrett (2005).

8 loop fingerloop braid made using 15th century instructions documented by Benns & Barrett (2005 – instruction number 25)

5 loop fingerloop braid made for the purse strings using 15th century instructions documented by Benns & Barrett (2005 – instruction number 1)
I finished the second of the gold-wrapped pretzels, which were made using instructions from Carey, 2009. These were sewn into the lining along each of the two side seams at the top of the bag.
The tassels were assembled with three needlelace leaves suspended from a silk-wrapped acorn. Three acorns were suspended from the bottom of the bag, each on a gold loop. The other two acorns were suspended, one each, on the purse strings.

Relative size of the pouch shown by comparing it to an Australian 50 cent piece. The bag itself (excluding tassels and strings) is approximately 9.4cm by 10.4cm (9.4cm square being the smallest documentable bag I’ve come across).

Excluding the finishing of the top and side seams and the scent for inside, the sweet bag is otherwise fully assembled.
There is still white visible along the side seams, so I intend to fill these non-embroidered sections with either silk backstitch in green or gold couched down. I will also embroider gold thread around the top seam of the bag to finish it.
The final step in making the bag is to scent it, as was the purpose of a sweet bag (and being that the sweet in the name refers to the odour). There are a couple of sweet bag recipes from period that are available online, however, these are a little too complex for me to attempt in such a short period of time (given that my sweet bag is due for completion in 7 days). However, there is a simple 16th century Spanish recipe for orange blossom scented oil from Manual de mugeres en el qual se contienen muchas y diversas reçeutas muy buenas (Manual of Women in which is contained many and diverse very good recipes) that I will attempt to scent the bag with as I have all of the two ingredients at my disposal.
References
Benns, E and Barrett, G (2005). Take V Bowes Departed: A 15th Century Braiding Manual Examined. Published by Soper Lane. ISBN 0-9542380-6-0.
Carey, J. (2009). Sweet Bags: An Investigation into 16th and 17th Century Needlework. Published by Carey Company. ISBN 0 9523225 7 9.
Medieval & Renaissance Material Culture (accesssed January 2014). Manual de mugeres en el qual se contienen muchas y diversas reçeutas muy buenas (Manual of Women in which is contained many and diverse very good recipes). ‘Recipe for making orange blossom oil’ as published by Larsdatter.com.
http://larsdatter.com/manual.htm


Pingback: Introduction | cearashionnach
That is absolutely fabulous and congratulations to you! Love your work and process! Thanks for sharing!
Dorothy Khoo