Introduction to my sweet bag project
As part of my Royal Artisan duties, I am required to complete and Arts and Sciences project in the name of Queen Liadan. As I have been interested in sweet bags for a while, I decided it would be a project that I could learn new techniques as well as fulfilling my duties as Royal Artisan.
Through my initial research into sweet bags, I have identified 31 extant sweet bags from across the late 16th to early 17th centuries. For the 32 images, a short description and the sources, see the pdf:
Appendix of 31 sweet bags and references.
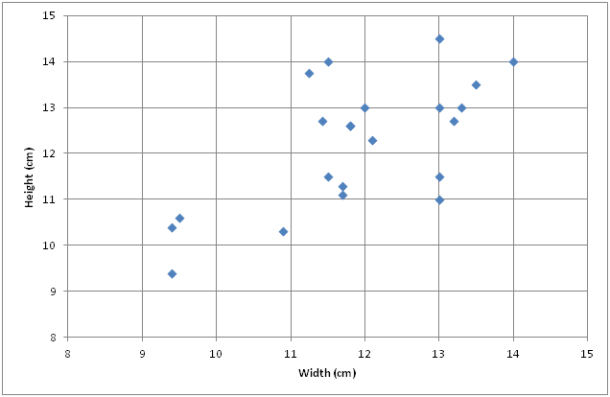
Wherever the information was available, I tabulated the dimensions and created a graph of the sizes of the extant sweet bags.
From this data I note that:
- Of 23 bags with a height listed, the largest was 14cm tall and the smallest was 9.4cm tall.
- Of 22 bags with a width listed, the largest was 14.5cm wide and the smallest was 9.4cm wide.
- 10 bags are wider than they are tall.
- 5 bags are exact squares.
- 7 bags are taller than they are wide.
This demonstrates the range in forms of the various extant sweet bags.
To decide on a size for my sweet bag, I considered the time I had to complete my project (i.e. it’s due at Fields of Gold in Politarchopolis in the last weekend of November). I also decided that I wanted the embroidery pattern square, and would therefore need a bag with dimensions that are taller than it is wide (to allow for the eyelets without disrupting the pattern). I ended up choosing the dimensions of 9.4cm wide (in line with the smallest extant bag) and 10.4cm tall, both of which dimensions fall within those of the graphed, extant bags.
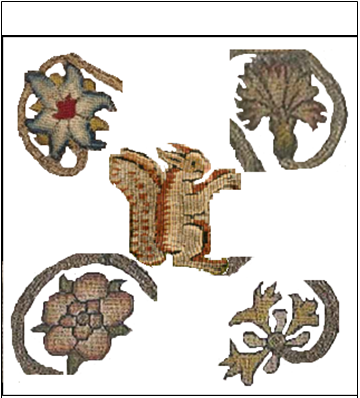
The next step was to come up with a design. Using the images of the extant sweet bags, I decided upon with the 5 motifs for the first side (four flowers and a squirrel, the latter pictured in Figure 25 of the appendix PDF). I’ve also decided to use the following motifs/design elements:
- Tent stitch (being listed in 15 of the 31 extant pieces) motifs of four flowers and a squirrel on one side;
- Tent stitch motifs of four flowers and a fox on the back (given the example of Figures 26 and 27, which is an example of two sides of the same sweet bag where the back and front have similar but different designs);
- Elizabethan braid stitch coiled stems in gold thread (e.g. Figures 4, 7, 9, 31);
- Background in alternating columns of gold couching and silk backstitch (as depicted in Jacqui Carey’s book , listed in the appendix pdf);
- Needlelace petals for some of the flowers;
- Needlelace tassels depicting oak leaves with thread-wrapped buttons depicting acorns (ties in with the squirrel motif, and was inspired from the grape leaves and grape tassels on Accession Number LEEAG.2008-8-3, published in Jacqui Carey’s sweetbag book);
- Cords braided in silk for the handle and drawstrings;
- Decorations of metal thread at the top of the bag (look like a pair of pretzels on the top).
It’s quite an intensive plan, however, I am undertaking the project in the order above so that I can stop at any time past the 4th dotpoint and have a finished sweet bag for November. The plan above is the ultimate goal.
Next, I mapped out the rough design on the computer for the 5 motifs for the tent stitch, which is my starting point. My motifs were all inspired by extant sweet bags, and were chosen because they appealed to me and made a unique pattern whilst still maintaining the look of extant sweet bags.
With the ground fabric, the extant bags were made from linen, silk satin, velvet or heavy paper (Figure 8 of the appendix pdf).
In terms of the base fabric, I chose linen. 16 of the 31 sweet bags have been listed as having a linen or linen canvas ground. In order to do tent stitch, and given that I’ve never done tent stitch before, and it’s important for the fabric to be even and having a large enough weave… I searched around and bought Cashel Linen, 28 count from OzStitch’s online store: http://www.ozstitch.com.au/shop/.
The silk thread I’m using is Madeira silk, which I’ve pulled apart into paired threads.
I’ve never done tent stitch (or cross stitch, or other similar stitched) before – I’ve been teaching myself through using books such as Elizabethan Stitches by Jacqui Carey. I must say that it isn’t my favourite stitch as I find it a bit dull, and the pixelated way the outlines work mess with my head. Here’s the progress I’ve made to date with the tent stitch:

Columbine flower outline (top left), squirrel, rose (bottom left) and honeysuckle (bottom right) in black tent stitch.

Completed columbine, partially completed carnation (top right), partially completed rose and partially completed honeysuckle.
The next step is to get the other side of the pouch finished. The four flowers will be the same, however, I intend to replace the squirrel with a fox. I hope to finish all of the tent stitch for my next update. If things go well, I also hope to get some of the Elizabethan plaited braid finished as well.


Awesome project! Great detailed explanation of everything.