The past month, inbetween preparing for Festival, writing up my sweet bag documentation (ALL THE WORDS!) and all the life things, I managed to get my first ever hose completely hand sewn up (one sock of two, I should say), start on my goldhaube (caul) and start patterning my fantabulous Saxon hat (i.e. the single most inspiring item of the whole outfit because it’s my primary catalyst for convincing me that this outfit needed to be made).
Hose
The hose is a sixteenth century pattern that Mistress Rowan uses, which she kindly patterned for Ginevra and I. We took the patterns home and each made one of two socks, adjusting the pattern as instructed to.
The first and most important step in making hose is to cut the fabric out on the bias. This gives the hose the stretch needed (like faux knitting) for socks. I cut my hose out of some white linen I had lying around, and then used running stitch to sew up all the seams by hand using a linen thread. I’ve since found out that backstitch is a better stitch to use as it has more give.
Most of the seams were then flat-felled (one side trimmed and the other side folded over twice, then whip stitched down) and the others were just doubled over and whip stitched down.
 Another lesson learnt through making this sock was that I need to use a fabric with more give, and probably a thicker fabric. This hose will likely wear through quickly, unfortunately. But, it’s all a learning process 🙂
Goldhaube (caul)
Ginevra and I ordered our silk brocades (gold for her and gold and orange/red for me) and they arrived a fortnight ago. This meant that I was able to start making my caul.
Using the caul pattern I devised (see Update 3), I marked the outline onto the silk lightly in a water soluble sewing marker. The pattern I want to embroider onto my caul is as seen in this Cranach image:
Following the working method I use for my Italian caul (see How to make your own 16th century decorative female coif/caul), I cut a piece of wadding the same size as the caul and tacked it to the back side of my silk brocade pattern outline. I then mounted the whole thing onto a wooden embroidery frame.
I have started to couch paired cords of admirality gold twist onto the brocade. I plan to sew four pearls (generously donated by Lady Juliana de Northwood) and a garnet (generously donated by Mistress Rowan) to each intersection.

The silk brocade is mounted onto the embroidery frame, with wadding tacked behind, and the gold twist is couched in checkers. This is between 2-3 hours of couching.
Hat
I have my heart set on making a ‘petal’ hat, which I intend to make with the orange silk brocade (kindly donated by Mistress Mathilde) with black feathers that have spangles down the spine (as Lady Ursula would say: spangle ALL the things!).
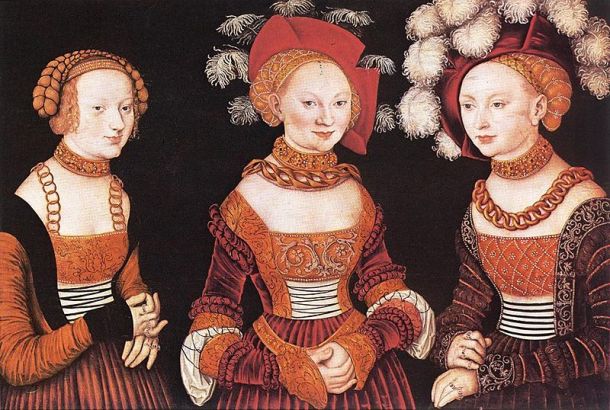
The hat is very much like that worn by two of the three princesses in this portrait by Cranach:

The Princesses Sibylla (1515-1592), Emilia (1516-1591) and Sidonia (1518-1575) of Saxony by Lucas Cranach the Elder in 1535.
Source: Wikimedia Commons
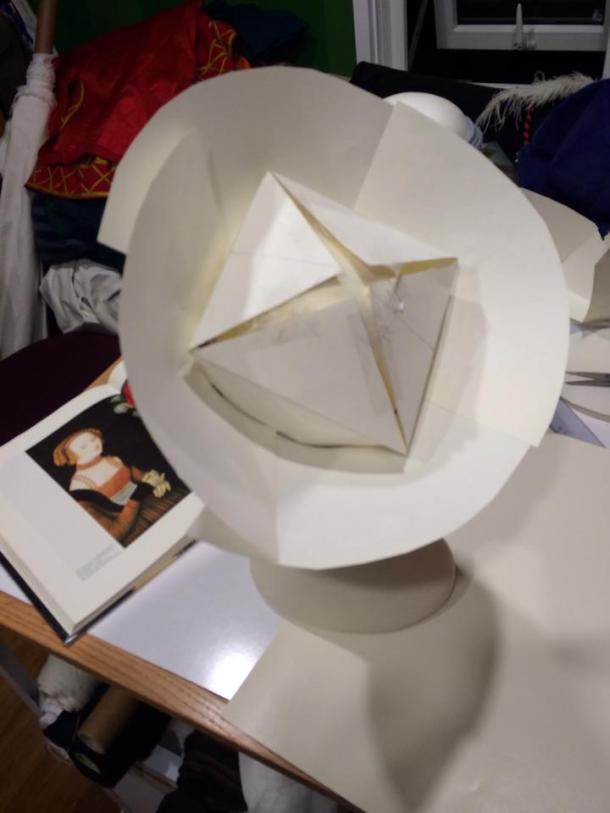
With Mistress Rowans help, we began to cut out templates for the hat from construction paper and stickytape. Rowan said, and I quote: “If it sits properly in construction paper, it will sit properly in fabric”.
First, four brim pieces and four top pieces were cut out and stickytaped together. These were placed on a head form.
The brim pieces were then moved, cut and splayed to try and get them to sit like in the period images (i.e. using cuts and stickytape to alter the pattern pieces so that we can re-cut the brim pieces and arrange them again). This process will be repeated until the pieces sit properly, and then they can be cut out of buckrum and silk velvet for the actual hat construction.

The process of adjusting the pattern involves cutting and taping the pattern pieces to get them to sit like the extant images.
Other posts about this project:


