Background
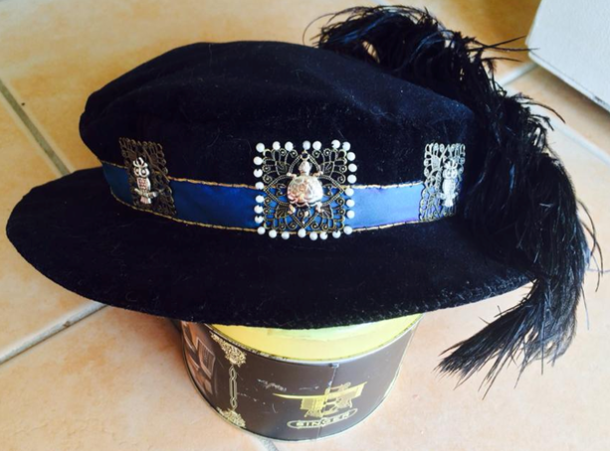
For a surprise Christmas present, I wanted to make a generic 16th century flat cap for a friend.
The first step was to decide on what style of flat cap to make, and what decoration/trimming options were available. I came across four portraits depicting flat caps that I liked the look of.
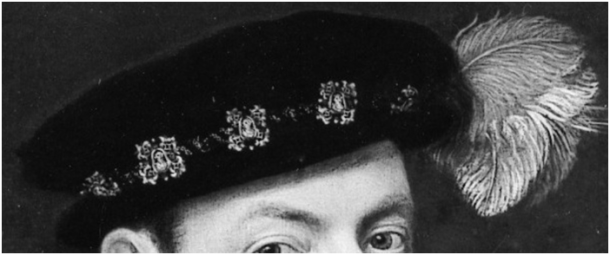
Figure 1: Detail from the Portrait of a Man, Possibly Ottavio Farnese (1524-1586), Duke of Parma and Piacenza, by Anthonis Mor van Dashorst (1519-1575). Image sourced from the Metropolitan Museum of Art (last accessed December 2014).
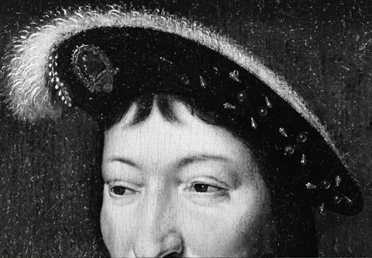
Figure 2: Detail from the portrait of Francis I (1494-1547), King of France, by the workshop of Joos van Cleve, image sourced from the Metropolitan Museum of Art (last accessed December 2014).
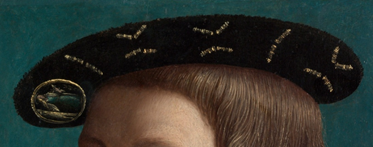
Figure 3: Detail from the Portrait of a Man Wearing the Order of the Annunziata of Savoy, possibly by an unknown French painter, first quarter of the 16th century. Image sourced from the Metropolitan Museum of Art (last accessed December 2014).
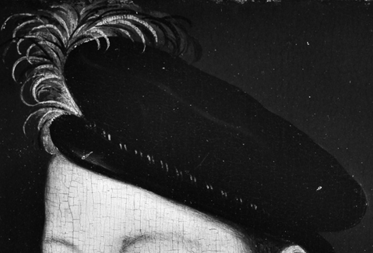
Figure 4: Detail from the portrait of Charles IX (1550-1574), King of France, in the style of François Clouet, painted after 1561. Image sourced from the Metropolitan Museum of Art (last accessed December 2014).
Method
The primary inspiration for the final product was Figure 1, however, the other three figures demonstrate some of the variations and similarities observed in this type of headwear in the 16th century.
Although three of the four figures are unfortunately in black and white rather than colour, it appears to me that all of these flat caps are likely made of a dark coloured velvet or wool. As such, I chose a black cotton velvet as the base fabric (which was more readily available than, say, silk velvet or a hat-appropriate wool).
After searching for patterns of flat caps online, I decided that I wasn’t enamoured of any particular pattern that I found. So, I decided to make my own pattern for a flat cap based the techniques I’d been taught by Mistress Mathilde Adycote of Mynheniot and Mistress Rowan Perigrynne in making my 16th century wide-brimmed Spanish hat (2011) and 16th century Saxony beret (2014).
I employed the assistance of Lady Ursula von Memmingen – very capable and willing when it comes to secret squirrel projects – to get the measurements of an existing flat cap belonging to the recipient to get basic measurements to start the draft of my hat pattern. I translated this to paper and used the paper to construct a model of the existing flat cap. From here, I tweaked various traits of the pattern to obtain a different shape (more similar to the crown of Figure 4 and the brim of Figure 1).
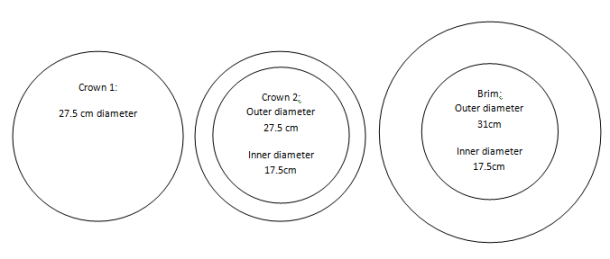
Figure 5: original flat cap pattern (not to scale) derived from Lady Ursula’s measurements from the existing hat.
To give a more solid structure to the brim, I made a structure from buckram and couched milliners wire around the inner and outer edge.

Figure 6: the outer edge of the buckram brim has milliners wire couched along the edge. A couple-of-inch overlap of the wire ends prevents the shape distorting (which would cause the ends to poke out).
After this, I sewed a strip of black, cotton bias tape around the wire (to ensure that it would remain attached to the buckram, and to cover any sharp edges of the ends of the wire from being able to poke through the velvet).

Figure 7: the outer edge of the buckram brim has had black cotton bias tape sewn over the milliners wire. The inside edge now also has milliners wire couched to it.

Figure 8: both the outer and inner edges of the buckram brim have had black cotton bias tape sewn over the milliners wire. This secures the wire, will prevent the imprint of the wire showing through the velvet, and will prevent the ends of the wire from poking through the velvet in the future.
Next, I cut out two brim pieces from the velvet – one an inch and a half larger than the buckram shape and one half an inch larger than the buckram shape. The inner circle was cut out with an inch overhang, which had triangular pieces snipped out to allow for the resulting tabs to be folded up and attached to the crown.
The larger brim velvet was attached to the bottom face of the buckram, with the inch-and-a-half overhang folder over the brim to the top side. Once the larger brim velvet was secured to the buckram, the smaller brim velvet had the half-inch overhang folded under and the piece was whip stitched to the overhang of the larger brim velvet piece.
The crown was constructed from a velvet outer and a canvas interlining (to give the velvet a supportive structure to sit upon). To make the second crown piece (Figure 5) sit more upright (like Figure 4), I made 8 small triangular pleats inwards to shrink the outer diameter of the pattern piece without altering the inner diameter. The result is that the crown sits more upright than the original pattern, however, it still flares out a little to keep the generic shape observed in a flat cap.
To decorate the hat, I chose to use a blue dupion silk (shot with green) that was given to me by Mistress Mathilde, recycled from the lining of a coat she wore during her time as Queen of Lochac. I appliquéd the silk in a band around the second crown piece, and couched gold twist along the edges to make it pop more.
Inspired by the filigree squares observed in Figure 1, I sourced some similar metal trimmings from Etsy and sewed eight of them down at regular intervals over the blue silk band.

Figure 9: The hat before it was lined, showing the blue silk band, gold twist couching and filigree metal squares.
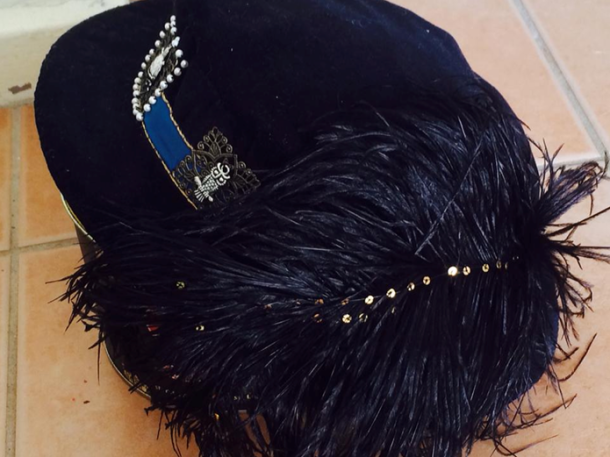
One commonly observed decoration on a flat cap (see Figures 1, 2 and 4) is the use of feathers. I trimmed down three black ostrich plumes for use on the hat. I then curled the feathers gently on a low setting with my hair straightener (the feathers arrived from the post flat). Before grouping them together with a metal aglet and couching them to the side of the hat, I sewed down a bunch of 2% gold spangles at regular intervals along the spine (see Figure 10). The use of black ostrich feathers and gold spangles was inspired by that observed in the 16th century German flat cap seen in Figure 11.
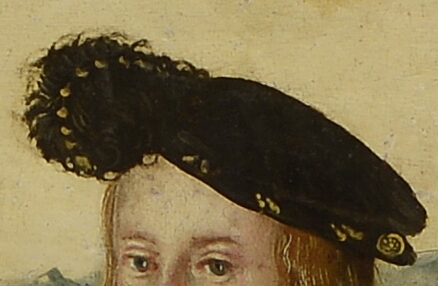
Figure 11: Detail from ‘Christ Blessing the Children’ by Lucas Cranach the Younger, 1551, as published in the Cranach Digital Archive.
For the lining, I decided to use more of the blue silk from the band to give the hat a luxurious look. I measured the diameter of the inside of the constructed hat from the brim, down to the crown, across the crown, and back up to the brim at the other side. I cut a circle out of the silk that was an inch wider than the measured diameter. I then did a large running stitch half an inch from the edge and pull-pleated it in to reduce it to the inner diameter of the brim. I then folded the edges a millimetre beyond the running stitch (to hid it) and whip stitched the lining in to the brim piece (see Figure 12 for the in-progress attachment of the lining and Figure 13 for the finished lining).
To more easily identify the front-centre of the hat, I decided to sew some pearls around the front-centre filigree square (Figure 14).

Figure 14: Me, wearing the hat to demonstrate the front, which is indicated by the pearls around the filigree square.
The recipient of the hat is fond of owl and turtle/tortoise motifs. As such, I found some brass-coloured charms of owls and turtles, approximately the same size as each other, from Etsy to appliqué into the centre of the filigree squares.

Figure 16: Close up of the front-centre filigree square, tortoise and pearls couched to the hat band.
Reflection
For a first attempt at making this form of headwear, I like the overall result. It took approximately 26 hours to pattern and construct this hat, spread out over 2 weeks.
There are, however, some things I would do differently if I were to repeat this project:
- I would prefer to source a stiffer buckram to use for the internal structure of the brim. The buckram I used does the job, however, the brim would be more sturdy if it were made of buckram of a similar stability as that I used to make my Spanish wide-brimmed hat.
- I would also prefer to source a bias binding tape that is thinner than the one I used. The brim doesn’t look too bad, but you can definitely see/feel a slight ridge caused by the tape beneath the velvet outer.
- In creating the crown, I attached the crown piece 2 to the brim before attaching the crown piece 1 (see pattern in Figure 5 for piece names). This made it difficult to attach because the buckram brim was structurally in the way.
- Lastly, I would try a different way to shape the crown piece 2 than to make the triangular pleats. The downside to this method is that the top seam is not as rounded as it could be.
What I like most about the final result is that the:
- contrast of the blue silk and the black velvet is striking, and the addition of the gold twist to edge the blue silk band really makes it pop,
- use of blue and the owl/turtle charms personalises the hat to the recipient, and
- style and trimming of the hat should hopefully match the garb worn by the recipient.
I hope to make some more hats in the future, and I also hope that I’ll get the time to explore some different shapes and methods for creating variations of the flat cap and similar 16th century hats.
References
The Metropolitan Museum of Art (last accessed December 2014).
- Figure 1: Portrait of a Man, Possibly Ottavio Farnese (1524-1586), Duke of Parma and Piacenza, by Anthonis Mor van Dashorst (1519-1575).
- Figure 2: Portrait of Francis I (1494-1547), King of France, by the workshop of Joos van Cleve.
- Figure 3: Portrait of a Man Wearing the Order of the Annunziata of Savoy, possibly by an unknown French painter, first quarter of the 16th
- Figure 4: Portrait of Charles IX (1550-1574), King of France, in the style of François Clouet, painted after 1561.
The Cranach Digital Archive (last accessed December 2014).
Materials and their Sources
- Black velvet – acquired from Spotlight Queanbeyan, NSW
- Black cotton bias tape – acquired from Spotlight Queanbeyan, NSW
- Medium-sized black ostrich feathers – acquired from the Photios Brothers online store
- Gold-gilt spangles (aka paillettes) – acquired from the online store for Hedgehog Handworks
- Blue dupion silk – recycled from the lining of Mistress Mathilde Adycote of Mynheniot’s coat from her time as Queen of Lochac
- Admirality Gold Twist – purchased from Peppergreens in Berrima, NSW (before it closed in 2012)
- Milliners wire – acquired from Spotlight Queanbeyan, NSW
- Buckram – acquired from Oman from Mistress Mathilde Adycote of Mynheniot
- Filigree metal squares – acquired from thejourneysend Etsy Store
- Turtle charms – acquired from the online store Eureka Beads
- Owl charms – acquired from the online store Sunset Crystals
